Saturday, November 30, 2013

Upcycled Vase

I came across this pin of a vase wrapped in twine.  Of course I can do something like that.  But, I also wanted something a little nicer.

The website wasn't much help because nothing really came up on it.  I kept the pin to look at the picture.

Picture

I decided to use a vase instead of a bottle.  We have a vase that we never use, so I thought it would make a great victim.  I went to the fabric store and got trim instead of using twine.  I wanted it to look more professional for the new bathroom.  All I used was a hot glue gun to attach the trim.

My Pictures


I didn't want to go all of the way up.  I will probably put fake flowers in it since I'm allergic to real ones.  I hate the way fake flowers look in a glass vase, so now you won't see the stems.  I can't wait to get some flowers!

Upcycled Trash Can


I found this pin that had a trash can covered with burlap, ribbon, and homemade rosettes.  My daughter has a similar trash can, but it's silver.  We are moving in June and I figured that I should start some projects for the new house.  This is my first one!

Website

The website doesn't have directions because it just has a bunch of samples using burlap.

Picture


My daughter's room is going to feature purple, so that's what I went with.
My Pictures


It was pretty easy to do and only took a half hour.  I'm not a pro at this stuff, so it would probably take less for those that are.  I think this will look so cute in my daughter's room.

Sunday, September 29, 2013

Tikka Masala

Ok this didn't come from Pintrest so I decided to put it on there.  I did find the recipe from googling it and then when I wanted to make it again, I wished I pinned it because it took a half hour to find it again. 

The Website

The Directions

Lamb Tikka Masala
Adapted from Cook’s Illustrated Chicken Tikka Masala recipe
Serves 5
For the Lamb Tikka:
1-3/4 lb boneless lamb leg, trimmed and cut into 1 inch cubes
1 tbsp garam masala
1 tsp coriander, toasted and ground
1 tsp cumin, toasted and ground
1 tsp kosher salt
1/2 tsp ground black pepper
1 cup plain whole milk yogurt
For the Masala Sauce:
3 tbsp vegetable oil
1 large onion, small dice
3 cloves garlic, minced
2 tsp fresh ginger, grated
1 serrano chile, seeded, ribbed and finely minced.  ( I went for 1/2 a pepper for heat-sensitive guests and felt like there was zero heat.   I like a kick and would go with 2 peppers, seeded and minced next time, or plan on making a spicy condiment to up the heat on a per-plate basis)
1 tbsp tomato paste
1 tbsp garam masala
1 28oz can crushed san marzano tomatoes
2 tsp sugar
1/2 tsp kosher salt
2/3 cup heavy cream
1/4 cup fresh chopped cilantro
In a large ziplock bag, combine garam masala, coriander, cumin, salt, and pepper.  Drop in the lamb and shake to combine, making sure it’s all thoroughly coated in spice mix.  Pour in the yogurt, and again, shake the bag to combine.  Tuck this into your fridge for at the very least 1 hour, but I recommend overnight.

30 minutes before grilling, pull your lamb out of the fridge and skewer them like kabobs, leaving a 1/4 inch space in between each piece.  If they were in the fridge overnight, you’ll want to let the skewers sit at room temp for about 20 minutes to take some of the chill off before grilling.    Right before these guys head to the grill, season both sides with a healthy pinch of kosher salt.

Lets get to that sauce.  Place a dutch oven over medium-high heat and pour in the vegetable oil.  Saute the onion until golden brown, about 10 minutes.  Stir in the garlic, ginger, chile, tomato paste, and garam masala, cooking until fragrant and slightly caramelized on the bottom, about 3-4 minutes.  Add the tomatoes, sugar and salt.  Bring to a simmer, then reduce heat to medium low, pop the lid on, and let it cook for about 20 minutes, stirring occasionally.
Now’s a good time to get that lamb grilled.    On a preheated super hot gas grill, give those skewers 3-4 minutes per side to get a nice char and still retain a tiny bit of pink on the inside.

Back to that sauce. Add the cream and stir for a minute or so until warmed through.  Then add in the lamb (pulled off the skewers, please) and top with the handful of cilantro (which I neglected to do in my rush to the table.  But do it.  Seriously.)  We served it up with some steamed basmati rice, peas, a delicious cucumber raita, and some toasted naan bread from Trader Joes.  Kim’s hands celebrated the meal!  Hurraaaay!

My Thoughts
It was delicious.  I love Indian food and I have always wanted to make it instead of always having to go to a restaurant to eat it.  The only thing I regret, I forgot to make naan.

My Pictures
                  

                                  It didn't look as red as it does in the pictures!                            
 

Wednesday, January 2, 2013

Blackhead Mask

I was up for trying another blackhead remover.  Mine just don't seem to go away.

Website

Directions
  1. Measure 1 Tablespoon of unflavored gelatin into a disposable container {if you put say, green jell-o on your face, there might be trouble}
  2. Add 1-2 Tablespoons of milk into the gelatin
  3. Until it looks like this
  4. Mix it up, and be quick about it, until you get a chunky consistency.  Add more milk if you’re uncomfortable with the amount of chunk.
Microwave the gelatin for about 10-15 seconds.  It will get creamier in the microwave.  Stir that around and start applying it IMMEDIATELY to your face.  This stuff hardens up fast so you’ve got to act fast.

Picture

My Thoughts
1. Well I didn't read the part that says you should microwave it.  I would suggest doing that.  The milk made the mask freezing. 
2. It does clump up very quickly and I barely had enough time to spread it on my face.
3. It smells like rotten milk - no, my milk was not rotten.
4. It does not peel off the way that she shows in the picture.
5. My face was soft afterwards.
6. My blackheads still existed.

My Pictures


With Mask - notice the clumps


Afterwards - it's hard to notice the blackheads, but they
are still there.  My skin is a little red from trying to
scrape off the mask.


I don't think I would waste my time doing this again
because I really hated the smell.

Saturday, December 15, 2012

Edible Glitter

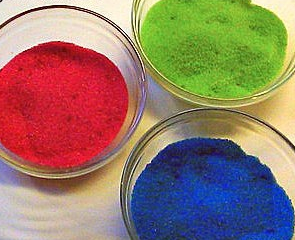
It's that time to be making Christmas cookies and I always want different ideas on decorations.  Why not edible glitter?

The Pin Picture

The Pin Says
I THINK I JUST DIED!!!! 1/4 cup sugar, 1/2 teaspoon of food coloring, baking sheet and 10 mins in oven to make edible glitter....Christmas cookies
 
I SHOULD HAVE NEVER LISTENED TO DIRECTIONS ON A PIN!

The Website

The Website's Directions
Make Non Toxic Glitter This glitter can be used for almost any type of project and may even be mixed with glue for special crafts
non toxic glitter
Tools needed for this project
  • Baking Pan
  • Jar
  • 1/4 cup of salt (or granulated sugar)
  • 1/2 teaspoon of LIQUID food coloring
  • Preheat an oven to 350 degrees
  • Oven for 10 mins
Directions:
  • 1/2 cup coarse salt (non iodized) or 1/2 cup granulated sugar
  • 2 -10 drops food coloring (a drop at a time), adjust for desired color
  • Measure salt or sugar into a clear jar with a tight fitting lid. Add food coloring one drop at a time and screw the cap on tightly. SHAKE to combine. Repeat until desired color is reached.
  • Sprinkle, dip or shake onto whatever you like. I like to put this in a clear salt shaker for easy shaking or pour some into a saucer and dip the wet rim of an empty glass in it to make the glass pretty!
NOTE:
  • Some recipes suggest that you bake in the oven for 10 minutes.
  • Paste food coloring can result in smoking
  • You may also store it in an air tight container for several months.
  • This stays drier and stores wonderfully as is but even better if you spread colored salt/sugar in a thin layer to air dry for about an hour or microwave in 30 second intervals, stir and repeat for about 1-2 minutes or until moisture is evaporated. You can also add a few grains of rice to absorb any moisture. Allow your homemade glitter to cool before using it.
  • Temperature extremes (weather) may cause different results
Be aware that colors like silver are hard to obtain.
 
Problems
1. It didn't look anything like glitter.
2. It was very clumpy, even stored in an air tight container.

My Picture

Nothing Like the Original Picture!!!  Don't waste your time.

Monday, December 10, 2012

Yummy Baked Potatoes

I'm always a sucker for a baked potato, so having one with a little bit of a twist, I'm on board.

Website

Directions
Slice whole potatoes aaalmost all the way through, so that the slices are all 
still attached at the bottom of the potato.
 Drizzle with olive oil and your favorites potato seasonings...
..bake for about 40 minutes at 425 F..
 
My Thoughts
I love them.  My husband isn't really a fan of baked potatoes but he was excited to eat them.  He told me how good they look.  This is definitely a keeper recipe.  I start them off by putting them in the microwave for 5 minutes to speed the process since baked potatoes take awhile to cook.
 
My Picture
Yup that's parm cheese as a topping.  I waited until the potatoes were done cooking before I added the cheese.  YUM!
 

Brussel Sprouts

I'm not a huge fan of brussel sprouts but sometimes I want a different side dish.  I feel like I'm always cooking the same side dishes.

Website

Directions
Ingredients
  • 2 lb Brussel Sprouts
  • 4 tbsp olive oil
  • 5 cloves garlic, minced
  • 1 lemon, juiced and zested
  • 3 tbsp gruyere, grated
  • sea salt
  • pepper

Instructions
  1. Clean the brussel sprouts by trimming off the ends and peeling the outer layer of the sprout off. Cut each one in half.
  2. Heat the oil in a large skillet over medium high heat.
  3. Once heated, add the halved brussel sprouts to the pan and saute for about 7-8 minutes on each side until the outer part is a caramelized brown and the inside is soft and fully cooked.
  4. Add the garlic half way through the cooking.
  5. Reduce the heat to low and add the lemon zest, juice, salt and pepper.
  6. Stir to combine and taste. Adjust seasoning if needed. Add the cheese on top and serve.
Their Picture


My Thoughts
These were good brussel sprouts.  My husband doesn't eat brussel sprouts and he said they are the best he has ever had.  That being said, he will only eat a couple and hope that I don't make them often.  I will use this recipe again, despite no one else in the family wanting to eat them.

My Picture
 

Sunday, December 9, 2012

DIY Glitter Play Doh

I never really thought Play Doh was expensive so I never really understood why people make it.  But why not jump on the Pinterest bandwagon and make some.

Website
http://tenkidsandadog.blogspot.com/2010/01/s-is-for-snow.html

Their Picture


My Thoughts

Maybe I made it wrong, but it was crumbly.  I played with it to mix in the glitter and to soften it up, which it did.  However, I tried making a snake and it kept breaking off.  I don't think this would be fun to play with.  Plus the peppermint smell might make a child think they can eat it.  I would just go buy Play Doh instead of wasting the time.

My Pictures


I have no clue how they got the Play Doh so white in the picture!!!

Monday, November 26, 2012

DIY Gel Air Freshener

I know that it's been awhile, but I'm back.  Part of the reason is for being sick and the other part is for trying to figure out what I want to take on as a challenge.

I already tried an air freshener that didn't work so why not try another.

Website

Their Picture

Directions
All you need is:
2 Envelopes unflavored Gelatin 
1tsp or more of some perfume or other fragrance
1/2 cup hot water
1/2 cup ice cold water
Food coloring 
A small jar like a jelly or baby food jar

Mix the gelatin and hot water in a bowl until the gelatin in dissolved. Stir in Fragrance and food coloring, then the ice water. let set in a cool place. ( do not put it in the frige)  


My Thoughts
It smells great, when you put your nose to it.  I would assume that's the essential oil that I chose.  I cannot even smell it about 6 inches away.  It definitely will not scent up a room.  Oh well.  I guess it's just easier to buy air fresheners.

My Picture

Yeah I went ghetto and put it in tupperware.  I figured there was no point in making it look nice if I don't know how it's going to turn out.

Saturday, November 17, 2012

My Leave of Absence

I haven't posted in awhile due to the fact that I've been sick.  I'm being treated for Lyme disease and I'm still awaiting the test results.

I have been looking up stuff on Pinterest but I've been having trouble figuring out what would be good to test.  I seem to keep seeing the same pins and nothing that's catching my eye to test.  There is a homemade pore strip that I would like to try but I need to by plain gelatin and I haven't found it yet.

So I'm asking you what you would like to see tested.  If there's a pin that you are curious about, please let me know and I'll see about testing it.

Sunday, October 21, 2012

Diaper Pail Deodorant Disk

I have a special needs child.  Even though she's 3 and 1/2, she's no where near ready to be potty trained.  With that comes an extended use of the diaper pail.  It reeks!!!!  I have tried the ones from Arm and Hammer and even 3 at a time with no luck!  So what could it hurt to make one and see what happens?

Website

Directions
For baking soda disks, you will need:
  • distilled or boiled water
  •  2 cups of baking soda
  • your choice of essential oils 
  • a muffin pan
  • paper muffin cups

Add a few drops of essential oil to a small amount of water. Mix the water with the baking soda. Mix well. Gradually add and mix more water until you have a thick paste.
 Press about ½" of paste into each muffin paper and let dry 24 hours. Tear the paper off. After you've used each disk for a month or so (however long you find it effective), crumble the disk into the diaper wash. Baking soda deodorizes and softens the diapers.
This recipe made me a year supply. Happy Diapering! :) 


My Thoughts

Our pail still reeks!!!  It's beyond repair I believe.  We should just invest in getting another since we don't know how long we will be using it anyways.  These disks might work in the fridge or something less potent, but not a diaper pail.  Luckily the only time we smell the pail is when we have to empty it and put in a new bag!!


Saturday, October 13, 2012

Cleaning Cookie Sheets, Again?

You've all seen my dirty cookie sheets before, so I needed another cleaning method since the first didn't work.  This one seemed more practical.

Website

Directions
After sprinkling the spot with baking soda, then hydrogen peroxide, then another layer of baking soda… I left it sitting there like that while we went to breakfast. When we got home I rubbed a little of the cleaner off and was actually quite astonished to see MOST of the gunk came right off! Minimal rubbing with my fingers (you could use a scrubbie too) was required.

Their Pictures

My Thoughts
Blah!  My cookie sheets are getting thrown out today and I'm buy new.  It's not like they are that expensive anyways.  I'm sick of trying to clean them.  This does not work like the pictures!!!  I will say that it didn't spell horrific like the other method, so that made this method a little better.

My Pictures


Before


During


And After


This cookie sheets should have been replaced a long time ago!  What was I thinking???

Tuesday, October 2, 2012

Oven Cleaner

I bought this oven cleaner and it got almost all of my oven clean.  There's these little specks on the window that I cannot get off.  Of course I'm going to try something from Pinterest to see if it will work on those specks.

Website
http://diyhshp.blogspot.com/2011/11/how-to-clean-oven-glass-it-seriously-is.html

Directions and Pictures
ant to clean your oven? I promise its super easy.
Ingredients:
Water
Baking Soda
Add about a 1/4 cup of baking soda in a dish and mix just enough water to make a slightly runny paste. 
Spread your mixture all over your glass (and the door if it needs it too. Mine did).
Wait 15-20 minutes (or if it is really, really bad like mine you can wait 30 minutes. Not sure if this is necessary but that's what I did.).
After 15, 20, or 30 minutes wipe off. If there are still spots left they should easily scrub off with a scour pad.
And Voila...
 
 
My Thoughts
 
Well my specks are still there and my oven looks the exact same as when I started.  I actually think this was harder to clean off of the oven because the baking soda is hard.  It took me several paper towels and cleaning wipes to get all of the cleaner off.  I wouldn't bother with this again.
 
My Pictures
(notice on the second picture that the specks are still there)


Don't waste your time!

Saturday, September 29, 2012

Homemade Body Scrubs

I haven't been buying body scrubs for the past couple of years because I feel like they are such a rip off.  I love the way it makes my skin feel, but 20 bucks is a bit out of hand.  Ever since I lived at home as a teenager, someone was always stealing it from me and when I would go to use it, it would be gone.  How could I resist a homemade recipe? So how could I resist 24 recipes?

Warning: These recipes are sold for $3.99 (not from me)

Website


My Thoughts

I've tried several, and it's worth the money to spend on the recipes.  They aren't just sugar and oil and scent.  They are full on mixtures but still keeping it at a cheap price.  The recipe makes a ton, so I cut it in half to make smaller portions.  I want to try all of the recipes and how can I do that if I keep the same one around for a long time.


One Thing I Changed

I like to use Grapeseed Oil because it's a lighter oil.  They have a large quantity of it at Target for about the same price as the cheap olive oil.  It's more expensive everywhere else and for half the quantity.

My Picture of Caramel Apple
(yes I keep them in tupperware)

 These will make great Christmas Gifts!  I will have to buy nicer containers though!


Tuesday, September 25, 2012

Greek Pasta Salad

I love pasta and Feta Cheese.  What a great combo.  I had to try this one!

Website

Picture
Man that's a great picture.  Looks like it's from a restaurant.

Directions

For the Dressing

1 cup olive oil
3/4 cup red wine vinegar
2 teaspoons garlic powder
2 teaspoons basil dried basil
2 teaspoons dried oregano
2 teaspoons Za'atar*
1-1/2 teaspoons freshly ground black pepper
2 teaspoons granulated sugar

For the Salad

1 pound rotini pasta cooked according to package directions
1 pint cherry tomatoes, cut in half (you can also sub in grape tomatoes)
1 large cucumber, seeded and chopped
1 red bell pepper, chopped
1 green bell pepper, chopped
4 green onions, thinly sliced
3/4 cup Kalamata olives
1-1/2 cups crumbled feta cheese
1 7-ounce pepperoni stick, sliced

Directions:

1. In a a large Mason jar or other sealable container, combine olive oil, vinegar, garlic powder, basil, oregano, Za'atar black pepper, and sugar. Shake well to combine.
2. In a large bowl, combine cooked pasta, tomatoes, cucumber, bell peppers, green onions, olives, feta cheese and pepperoni.
3. Separate and reserve ½ cup of dressing in the refrigerator.
4. Toss the pasta salad with the rest of the dressing until evenly coated. Cover, and chill overnight.
5. Right before serving, freshen the salad with the reserved dressing, tossing to coat.


My thoughts

 Great recipe and great dressing.  I couldn't find Za-atar so I worked without it.  I also don't like peppers or olives, so I skipped those too.  I added chicken to it to make it a meal instead of a side dish.

This is a pasta that I will make many more times!


My Picture


Crock Pot Applesauce

I've mentioned before that I want to go fresh.  Instead of buying applesauce, which is so easy, why not make it?  Might as well complicate things for myself, but at least it's fresh.

Website

Their Picture

Directions

Ingredients:
    8 medium apples (Use a combination of Golden Delicious, Honey Crisp, Fuji, Gala, etc.) (I filled the crockpot, using about 20 small apples)
    1 strips of lemon peel - use a vegetable peeler
1 tsp fresh lemon juice

3 inch cinnamon stick

5 tsp light brown sugar (unpacked) - or agave


1.  Peel, core and chop the apples.

2.  Add the sugar, lemon peel, lemon juice and cinnamon stick.

3.  Set crock pot to low and cook for 6 hours. Stir apples occasionally, apples will slowly become a delicious applesauce. Remove cinnamon stick and use an immersion blender to blend until smooth or if you prefer a chunky sauce, leave sauce intact. (I used a whisk, which gave the sauce a nice chunky consistency.)

4.  Can and process as you would other recipes or keep refrigerated up to 3 weeks.


My Thoughts

I cut the recipe in half to see if I would like it and it didn't make a lot of sauce.  It's amazing how many apples put in to it and what comes out.  

It needed some sugar, so I will add some.  Other than that, I like the recipe.  It's nice to just put it and and forget about it for awhile.

My Picture
(I use a liner in my pot so I don't have to wash it)


It's a little hard to see.  Sorry about that.  Try it out!
 

Italian Chicken

I love an easy recipe.  Just throw it in the stove and forget about it for awhile, sign me up.

Website

Picture

Directions

 4-6 raw chicken breasts, new potatoes, green beans (fresh or canned-really any green veggie would work. Broccoli is good, too). Arrange in 9x13 dish. Sprinkle with a packet of Italian dressing mix and then top with a melted stick of butter. Cover with foil and bake at 350 degrees for 1 hour. 
 
 
My Thoughts
 
My butcher splits my chicken and pounds it for me, so it's thin.  I knew that the chicken would cook faster than the vegetables, so I put them in first and then added the chicken. 

This was a great dinner!  It was so easy and tasted great!  I used different veggies though.

My Picture


Yum!  Give it a try!

Wednesday, September 19, 2012

Pickle Dip

I have always loved pickles.  My cousin and I would eat a whole jar of those really huge pickles that they sell at delis - but in one sitting.  I also like the juice.  I know some of you think I'm disgusting now and I'm ok with that.

I've been craving chips so this was a great time to make the dip.

Website
http://bunsinmyoven.com/2012/01/18/pickle-dip/

Directions
Ingredients
  • 8 ounces cream cheese, at room temperature
  • 1/2 to 1 cup dill pickles, depending on how pickly you like things
  • 1 tablespoon Worcestershire sauce
  • dill, for garnish, if desired
  • pickle juice
Instructions
  1. Chop the pickles into very small pieces.
  2. Combine with the cream cheese and Worcestershire sauce until well mixed. Splash in a bit of pickle juice to thin the dip out a bit (around 1 tablespoon, but more is fine, dependent on your taste).
  3. Serve cold or at room temperature with potato chips. 

Results

I  really liked the dip.  It is really pickly (is that a word), so don't try this if you only like pickles sometimes or just a little bit.  This is major pickle taste.


Tuesday, September 11, 2012

Room Air Freshner

I don't really like candles, so I thought this would be a great alternative.

Website
http://www.theburlapbag.com/2011/12/diy-room-air-freshener/

Problem
I can not smell this at all!  Even standing next to it!  I put extra scent into it and waited another day or two, and then put more scent into it - still don't smell it!  This sucks because I love cucumber melon scent!

Monday, September 3, 2012

Homemade Lip Gloss

I've been on a big kick lately with everything being fresh.  Now it's time to make homemade bath products instead of spending all of that money for it at the store.  I know that lip gloss isn't expensive, but no how many times I misplace it and have to buy another, it will be worth it.

Website

Directions
First up.. because the Kool-Aid is what supplies the color to your lip balm I would suggest you purchase a flavor that comes out red.  I mixed cherry and tropical punch together.  I have also done this recipe with Crystal light which tastes much better, but sometimes the crystals don't dissolve as well as the Kool-Aid ones do so it can be tricky.

Gather your supplies and in a microwave safe bowl (I ended up using a mixing cup) put a glob <--- that's a proper measurement right.. ok about a cup into the bowl and heat on high for about a minute. Stir. Do again. This is the repetitive part, I usually browse pinterest on my phone while standing next to the microwave.. or sometimes I eat raw cookie dough from the fridge.. whatever works for you!  Keep repeating this step and make sure to stir, stir and stir some more in between each heating. If you plan on making a lot of these I would suggest doing it in batches as it will be easier to melt down.  **please do in small increments to assure that you do not blow your microwave, also if you have access to double boiler that works great too!
 
Take your bowl of liquid greasiness =) and let cool for just a few seconds, stir in the kool-aid a little at a time and make sure it starts to dissolve (keep stiring!)  The more you add the darker it gets so this is up to you and what you want your lip gloss to look like, I used two whole packets for this pretty color.

Now if you use Crystal Light the flavor is so much better, since the Kool-Aid is bitter I simply pour in a couple packets of stevia just for a little sweet on my lips.  Oh and it's zero calorie in case you ingest the stuff!
 
My Thoughts
It's a very simple process, don't let the directions fool you.  She is just wordy with the directions.
 
I love this.  Vaseline is great for your lips.
 
The only problem is that it tastes so good, I'm scared I'm eating too much of it.  Ha Ha!
 
This will be a recipe that I will keep!