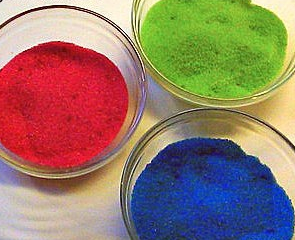
It's that time to be making Christmas cookies and I always want different ideas on decorations. Why not edible glitter?
The Pin Picture
The Pin Says
I THINK I JUST DIED!!!! 1/4 cup sugar, 1/2 teaspoon of food coloring,
baking sheet and 10 mins in oven to make edible glitter....Christmas
cookies
I SHOULD HAVE NEVER LISTENED TO DIRECTIONS ON A PIN!
The Website
The Website's Directions
Make Non Toxic Glitter
This glitter can be used for almost any type of project and may even be mixed with glue for special crafts

Tools needed for this project

Tools needed for this project
- Baking Pan
- Jar
- 1/4 cup of salt (or granulated sugar)
- 1/2 teaspoon of LIQUID food coloring
- Preheat an oven to 350 degrees
- Oven for 10 mins
- 1/2 cup coarse salt (non iodized) or 1/2 cup granulated sugar
- 2 -10 drops food coloring (a drop at a time), adjust for desired color
- Measure salt or sugar into a clear jar with a tight fitting lid. Add food coloring one drop at a time and screw the cap on tightly. SHAKE to combine. Repeat until desired color is reached.
- Sprinkle, dip or shake onto whatever you like. I like to put this in a clear salt shaker for easy shaking or pour some into a saucer and dip the wet rim of an empty glass in it to make the glass pretty!
- Some recipes suggest that you bake in the oven for 10 minutes.
- Paste food coloring can result in smoking
- You may also store it in an air tight container for several months.
- This stays drier and stores wonderfully as is but even better if you spread colored salt/sugar in a thin layer to air dry for about an hour or microwave in 30 second intervals, stir and repeat for about 1-2 minutes or until moisture is evaporated. You can also add a few grains of rice to absorb any moisture. Allow your homemade glitter to cool before using it.
- Temperature extremes (weather) may cause different results
Problems
1. It didn't look anything like glitter.
2. It was very clumpy, even stored in an air tight container.
My Picture
Nothing Like the Original Picture!!! Don't waste your time.

.JPG)
This was a horrible experience. Your picture looks exactly like mine, nothing like glittet
ReplyDeleteI do this all the time although it doesn't turn out like the original pic it is still more practical then running out to the store to buy them and they may not have the color you want. I customize my own and use them all the time.
ReplyDeleteWhen your glitter completely dries then you break up all the clumps its as easy as that
ReplyDelete