Saturday, December 15, 2012

Edible Glitter

It's that time to be making Christmas cookies and I always want different ideas on decorations.  Why not edible glitter?

The Pin Picture

The Pin Says
I THINK I JUST DIED!!!! 1/4 cup sugar, 1/2 teaspoon of food coloring, baking sheet and 10 mins in oven to make edible glitter....Christmas cookies
 
I SHOULD HAVE NEVER LISTENED TO DIRECTIONS ON A PIN!
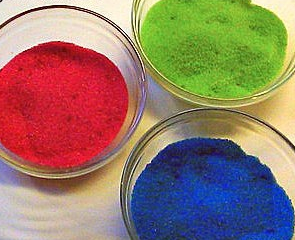
The Website

The Website's Directions
Make Non Toxic Glitter This glitter can be used for almost any type of project and may even be mixed with glue for special crafts
non toxic glitter
Tools needed for this project
  • Baking Pan
  • Jar
  • 1/4 cup of salt (or granulated sugar)
  • 1/2 teaspoon of LIQUID food coloring
  • Preheat an oven to 350 degrees
  • Oven for 10 mins
Directions:
  • 1/2 cup coarse salt (non iodized) or 1/2 cup granulated sugar
  • 2 -10 drops food coloring (a drop at a time), adjust for desired color
  • Measure salt or sugar into a clear jar with a tight fitting lid. Add food coloring one drop at a time and screw the cap on tightly. SHAKE to combine. Repeat until desired color is reached.
  • Sprinkle, dip or shake onto whatever you like. I like to put this in a clear salt shaker for easy shaking or pour some into a saucer and dip the wet rim of an empty glass in it to make the glass pretty!
NOTE:
  • Some recipes suggest that you bake in the oven for 10 minutes.
  • Paste food coloring can result in smoking
  • You may also store it in an air tight container for several months.
  • This stays drier and stores wonderfully as is but even better if you spread colored salt/sugar in a thin layer to air dry for about an hour or microwave in 30 second intervals, stir and repeat for about 1-2 minutes or until moisture is evaporated. You can also add a few grains of rice to absorb any moisture. Allow your homemade glitter to cool before using it.
  • Temperature extremes (weather) may cause different results
Be aware that colors like silver are hard to obtain.
 
Problems
1. It didn't look anything like glitter.
2. It was very clumpy, even stored in an air tight container.

My Picture

Nothing Like the Original Picture!!!  Don't waste your time.

Monday, December 10, 2012

Yummy Baked Potatoes

I'm always a sucker for a baked potato, so having one with a little bit of a twist, I'm on board.

Website

Directions
Slice whole potatoes aaalmost all the way through, so that the slices are all 
still attached at the bottom of the potato.
 Drizzle with olive oil and your favorites potato seasonings...
..bake for about 40 minutes at 425 F..
 
My Thoughts
I love them.  My husband isn't really a fan of baked potatoes but he was excited to eat them.  He told me how good they look.  This is definitely a keeper recipe.  I start them off by putting them in the microwave for 5 minutes to speed the process since baked potatoes take awhile to cook.
 
My Picture
Yup that's parm cheese as a topping.  I waited until the potatoes were done cooking before I added the cheese.  YUM!
 

Brussel Sprouts

I'm not a huge fan of brussel sprouts but sometimes I want a different side dish.  I feel like I'm always cooking the same side dishes.

Website

Directions
Ingredients
  • 2 lb Brussel Sprouts
  • 4 tbsp olive oil
  • 5 cloves garlic, minced
  • 1 lemon, juiced and zested
  • 3 tbsp gruyere, grated
  • sea salt
  • pepper

Instructions
  1. Clean the brussel sprouts by trimming off the ends and peeling the outer layer of the sprout off. Cut each one in half.
  2. Heat the oil in a large skillet over medium high heat.
  3. Once heated, add the halved brussel sprouts to the pan and saute for about 7-8 minutes on each side until the outer part is a caramelized brown and the inside is soft and fully cooked.
  4. Add the garlic half way through the cooking.
  5. Reduce the heat to low and add the lemon zest, juice, salt and pepper.
  6. Stir to combine and taste. Adjust seasoning if needed. Add the cheese on top and serve.
Their Picture


My Thoughts
These were good brussel sprouts.  My husband doesn't eat brussel sprouts and he said they are the best he has ever had.  That being said, he will only eat a couple and hope that I don't make them often.  I will use this recipe again, despite no one else in the family wanting to eat them.

My Picture
 

Sunday, December 9, 2012

DIY Glitter Play Doh

I never really thought Play Doh was expensive so I never really understood why people make it.  But why not jump on the Pinterest bandwagon and make some.

Website
http://tenkidsandadog.blogspot.com/2010/01/s-is-for-snow.html

Their Picture


My Thoughts

Maybe I made it wrong, but it was crumbly.  I played with it to mix in the glitter and to soften it up, which it did.  However, I tried making a snake and it kept breaking off.  I don't think this would be fun to play with.  Plus the peppermint smell might make a child think they can eat it.  I would just go buy Play Doh instead of wasting the time.

My Pictures


I have no clue how they got the Play Doh so white in the picture!!!